Connect to Web Disk with Third-Party Software
Last modified: 2025 June 10
Overview
You may want to connect to the Web Disk feature through software that includes the WebDAV functionality, such as Transmit™ or BitKinex.
Connect to Web Disk with a configuration script
cPanel’s Web Disk interface (cPanel » Home » Files » Web Disk) provides configuration scripts for many common operating systems, applications, and devices. Availability of configuration scripts depends on the version of cPanel & WHM that your server uses.
To download the configuration script for a supported operating system or application, perform the following steps:
- Navigate to cPanel’s Web Disk interface (cPanel » Home » Files » Web Disk).
- Click Configure Client Access for the desired account.
- Select the desired connection type from the menus.
- Click Download Configuration Script to download the configuration script.
- If your system will not uncompress it automatically, unzip the
.zipconfiguration script file. - Search for the
hostname Secure WebDiskfile, where hostname represents your server’s hostname. - Open the file and allow it to run in order to configure Web Disk.
Connect to Web Disk manually
To find the configuration details for your Web Disk account, navigate to cPanel’s Web Disk interface (cPanel » Home » Files » Web Disk) and click Configure Client Access for the desired account. The interface will display the configuration information for the account.
In every connection method, Additional Web Disk Account usernames must include the domain for the account (for example, [email protected]). The Main Web Disk Account does not require the domain.
Apple Operating system
To connect to Apple® operating systems (for example, macOS® X or Sierra), perform the following steps:
- Open Apple’s Finder application.
- From the Go menu, select Connect to Server.
- Enter the Web Disk server’s URL in the Server Address text box (for example,
https://example.com:2078). - Click Connect.
- Enter your Web Disk account’s username and password.
- Click Connect.
BitKinex
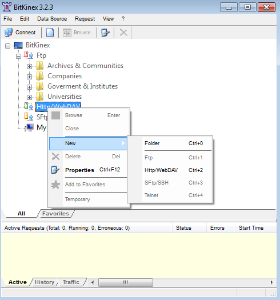
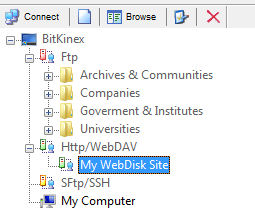
To connect to Web Disk with BitKinex, perform the following steps:
- Open BitKinex.
- Select Http/WebDAV in the menu.
- In the Server window, enter your Web Disk account’s login information. The new connection will appear in the BitKinex list.
- Double-click your site’s name to open your Web Disk.
For more information, visit the BitKinex website.
Konqueror
To connect to the Konqueror application, perform the following steps:
- Open Konqueror.
- Paste the following address into the address bar, where
example.comrepresents your server’s hostname.WebDAVs://example.com:2078 - To save the location for future use, click Bookmarks and then select Add Bookmark.
Nautilus
To connect to the Nautilus application, perform the following steps:
-
Open Nautilus. If you do not see an address bar, click Go and then select Location.
-
Paste the following address into the address bar, where
example.comrepresents your server’s hostname.davs://example.com:2078 -
To save the location for future use, click Bookmarks and then select Add Bookmark.
Transmit
To connect to Web Disk through Transmit™, perform the following steps:
- Open Transmit.
- Click WebDAV.
- Enter your Web Disk account’s login information.
- Click Connect to open the Web Disk folder.
For more information, visit the Transmit website.Note:Choose the Mount as Disk option to access the Web Disk directly from your Finder window.
Windows® Operating System
To connect to Microsoft® Windows operating systems (for example, Windows® 8 or Windows® 10), perform the following steps:
- In your preferred browser, navigate to
https://example.com:2078, whereexample.comrepresents your server’s hostname. - In the Start menu, select My Network Places.
- Perform the appropriate actions for your system:
- Other Windows operating systems — Click the icon for the domain that corresponds to the Web Disk account’s domain.
- Windows® XP — Click Add a network place, click Next, select Choose another network location, and then follow the prompts to finish the configuration process.
- If you use Windows XP, Windows® Vista, or Windows® 2003, you may experience errors when you attempt to connect to your Web Disk account. These operating systems require a patch that Microsoft no longer offers, and it no longer supports these operating systems.
- If you use Windows® 7, a discrepancy may exist between the amount of disk space that the system reports and the actual available disk space. This happens because the WebDAV protocol, which Web Disk uses, cannot query a server’s disk capacity.