Setup Automatic ACH Payment
Last modified: 2025 June 9
Overview
Use the Setup Automatic ACH Payment interface to generate a form to enroll in Automated Clearing House (ACH) payments from your checking or savings account.
Important:
You must use a United States (US) bank account to set up ACH payments.
Set up ACH payments
Note:
You must provide a cancelled check from your bank account to set up automatic payments.
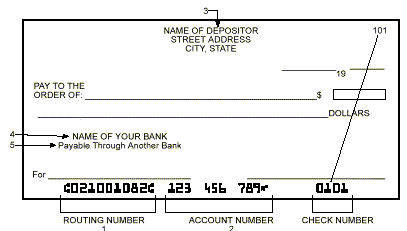
Use this image to locate the required information on your check:

To set up automatic ACH payments, perform the following steps:
- Enter the nine-digit routing number in the Routing Number [1] text box.
- Enter your bank account number in the Account Number [2] text box.
- Select which Account Type matches your bank account. If you do not know the account type, contact your bank.
- Enter the full name of your bank or financial institution in the Depository Name (Financial Institution) [4] text box.
- Enter your bank or financial institution’s branch name in the Branch Name text box.
- Enter the City, State, and Zip that appear on the top of the check in the appropriate text boxes.
- Click Fetch Form.
- Manage2 will display a PDF form. Print and sign the provided PDF document, then upload the form with a copy of a cancelled check through the Upload Forms interface.
After you complete ACH enrollment, your monthly invoice will automatically withdraw from your account on or around the 28th of each calendar month.
Stop automatic ACH payments
To withdraw from the automatic ACH payment program, click Help in the toolbar at the top of the Manage2 interface for Customer Service contact information.