We log search terms to improve our documentation. For more information, read our Privacy Policy.
Blocking and Protecting Your Website
Last modified: 2026 October 1
Overview
Protect your websites from unwanted traffic by blocking IP addresses, preventing hotlinking, and enabling the Web Application Firewall (ModSecurity®).
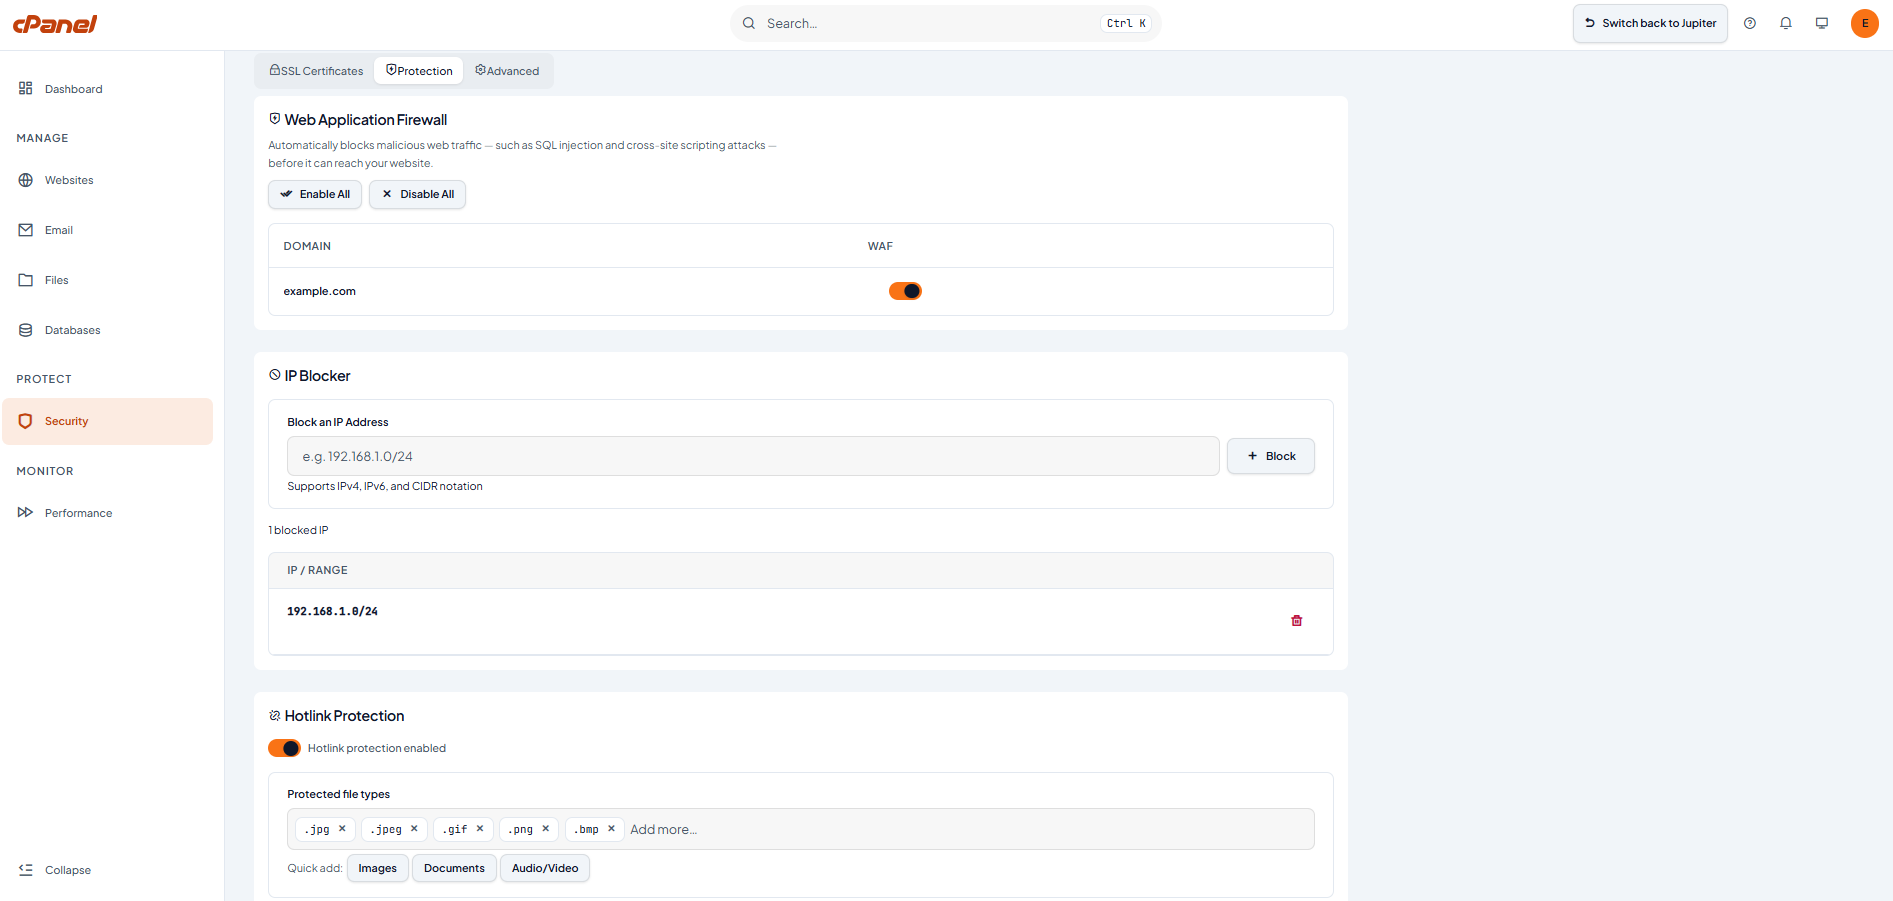
To access these features, open the Security hub and select the Protection tab.
Block an IP address
Use IP Blocker to block a specific IP address or IP range from accessing your websites. Block an IP address when you identify a source of unwanted traffic, such as a bot that repeatedly sends requests or a visitor who scrapes your content.
To block an IP address, perform the following steps:
- In the Protection tab, find the IP Blocker section.
- In the Block an IP Address field, enter the address or range you want to block. For example,
192.168.1.0/24. The field accepts IPv4, IPv6, and CIDR notation. - Click + Block.
The new entry appears in your list of blocked IPs, and requests from that address stop immediately. Add as many addresses as you need. You can unblock an IP address at any time.
Unblock an IP address
To unblock an IP address, perform the following steps:
- Find the address in your list of blocked IPs.
- Click the trash icon next to it.
Your site accepts requests from that address again immediately.
Set up Hotlink protection
Other websites can link directly to your images or files instead of hosting their own copies. When visitors access those files from another website, your server uses bandwidth to deliver that content.
Hotlink protection prevents other websites from using your files by blocking requests that do not come from your own domains. You can choose which file types to protect, including images, documents, audio, and video.
If your hosting provider has not enabled Hotlink Protection for your account, the option does not appear. If you expect this feature but don’t see it, contact your hosting provider.
To enable Hotlink protection, perform the following steps:
- In the Protection tab, find the Hotlink Protection section.
- Switch the toggle to enable the Hotlink protection.
The label changes to “Hotlink protection enabled” and reveals the rest of the settings.
To choose which file types to protect, perform the following steps:
- Look at the Protected file types list. cPanel starts you off with common image extensions (
.jpg,.jpeg,.gif,.png,.bmp). - Remove a file type by clicking the X next to it.
- Add a file type by typing its extension into Add more….
- Use the Quick add buttons, Images, Documents, or Audio/Video, to add a whole group of common extensions at once.
Block direct requests (no referrer)
A referrer shows the webpage that sent a visitor to your file. Direct requests do not include a referrer because the visitor opens the file URL directly instead of accessing it through another page.
To block direct requests, perform the following steps:
- Enable Block direct requests (no referrer).
- Select the action that you want Hotlink protection to take when it detects a hotlink.
When you enable this option, Hotlink protection blocks visitors who access your files directly through their URLs. Disable this option to allow direct access to your files, such as when you want search engines to index your images.
Choose one of the two options under When a hotlink is detected:
- Return 403 Forbidden — Blocks the request and displays no content to the visitor.
- Redirect to URL — Sends visitors to a specific page instead, such as a page that explains why the file is unavailable.
Manage your allowed referrer URLs
To manage your allowed referrer URLs, perform the following steps:
- Enter a URL in the Allowed referrer URLs field. For example,
https://example.com. - Click Add.
- Repeat for every domain that should be allowed to link to your files, including both the
http://andhttps://versions, and both thewwwand non-wwwversions if you use them. - To remove a URL, click Remove.
Only visitors coming from your allowed referrer URLs can load the protected file types directly. Everyone else is blocked or redirected, based on the option you chose above.
Add every version of your domain to the allowed list: http://, https://, www, and non-www. Missing one can cause your own site to trigger the block.
Configure the Web Application Firewall (ModSecurity)
The Web Application Firewall (ModSecurity) helps protect your websites from common web attacks before they reach your applications. For example, it blocks attacks such as SQL injection and cross-site scripting. When you enable the firewall, cPanel increases your Security Score and displays the Web Firewall status card at the top of the Security hub.
If your hosting provider has not enabled Web Application Firewall (ModSecurity) for your account, this option does not appear. If you expect this feature but don’t see it, contact your hosting provider.
Enable the Web Application Firewall for all domains
To enable the Web Application Firewall for all your domains at once, select Enable All.
Once you enable the firewall, the interface displays the Web Firewall status card at the top of the Security hub. The card shows the firewall status, the number of protected domains, and a Configure link that returns you to the Web Application Firewall section.
Enable the Web Application Firewall for a domain
To enable the Web Application Firewall for a single domain, perform the following steps:
- Go to the Web Application Firewall section.
- In the domain table, find your domain under the DOMAIN column.
- Switch the toggle under the WAF column to enable the firewall for the domain.
Every domain you enable now runs behind the firewall.
Disable the Web Application Firewall protection
To disable the Web Application Firewall, choose one of the following options:
- Switch a single domain’s WAF toggle to Disable.
- Click Disable All to disable the firewall for all domains.
What these tools don’t cover
- They do not secure your whole server. Server-wide hardening happens in WHM and is an administrator’s job. These tools only protect your account.
- They do not stop large-scale DDoS attacks. For that, work with your hosting provider or use an external content delivery network.
- They do not scan your site for malware. Malware scanning is a separate feature, sometimes available as a paid add-on.