Guide to DNS Cluster Configurations
Last modified: 2026 January 28
Overview
A DNS cluster is a group of authoritative nameservers that share records with each other. This allows you to physically separate nameservers that handle the DNS requests from your cPanel & WHM servers.
- WHM’s DNS Cluster feature (WHM » Home » Clusters » DNS Cluster) only provides redundancy for DNS. It does not add Apache or any other services to a DNS cluster configuration.
- cPanel DNSOnly® allows you to run a dedicated physical nameserver. It only replicates DNS zones to your other servers. For more information, read our cPanel DNSOnly® documentation.
- In order to use this guide, you must have set up nameservers. For more information about how to set up nameservers, read our How to Set Up Nameservers in a cPanel Environment documentation.
DNS cluster requirements
To configure your DNS cluster, you must meet the following minimum requirements:
- Clusters must include at least two servers.
- You must have at least one cPanel & WHM server with cPanel & WHM installed. A DNS cluster that includes multiple cPanel DNSOnly® servers and cPanel & WHM servers is also acceptable.
- All machines in the DNS cluster must have cPanel & WHM or cPanel DNSOnly® version 11 or later installed. Some features may not work with older versions of cPanel & WHM.
DNS cluster structures
Before you set up your DNS cluster, consider which structure will be the most efficient. The way in which you link each server determines the speed at which your DNS requests resolve.
-
We recommend that you do not set up the nameserver to synchronize data to a cPanel & WHM server, because this creates extraneous zones on the cPanel & WHM server. This means that you do not need to log in to WHM on the nameserver and set the cPanel & WHM server’s Synchronize Changes DNS role. For more information about DNS server roles, read our DNS Cluster documentation.
-
If you set a server in a DNS cluster to the Write-only role, WHM will not check whether a DNS zone exists before you create an account. Because of this, it is possible to create the same domain name on two or more of these servers. If this occurs, the servers compete for updates to that domain.
-
Don’t link dedicated nameservers to each other, or link dedicated cPanel & WHM servers to each other.
Add trusted IP addresses
The /etc/ips.dnsmaster file contains your DNS cluster’s list of trusted nameserver IP addresses. By default, this file lists the nameservers’ main IP addresses in your cluster as trusted IP addresses. If the IP address for a nameserver does not match a trusted IP address, you may experience problems when users create addon or parked domains.
To use an IP address that is not listed in your DNS cluster’s /etc/ips.dnsmaster file as a trusted IP address, add the IP address to the /etc/ips.remotedns file. You may add the IP address manually or through WHM’s Configure Remote Service IPs interface (WHM » Home » IP Functions » Configure Remote Service IPs).
If you use remotely-clustered DNS nameservers, you must manually add their IP addresses.
Use direct links
Your servers function more slowly if multiple steps exist between a cPanel & WHM server and a nameserver. To improve the performance of your servers, link your cPanel & WHM server directly to the DNS servers. This eliminates the steps that each request must perform, and your DNS requests will resolve more quickly.
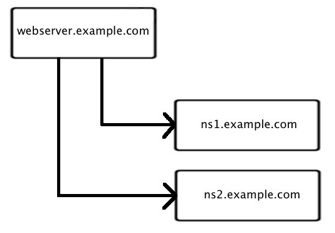
A direct link between the web server and each of two nameservers is optimal.
In this example, webserver.example.com is a cPanel & WHM server that sends DNS information directly to the nameservers ns1.example.com and ns2.example.com.
To create this configuration, you will need one cPanel & WHM server and one or more nameservers.
When you add the new nameserver to the cluster, you will need to log in to the nameserver and obtain an API token from that server.
To set up a DNS cluster with direct links, perform the following steps:
- Install cPanel & WHM on the server that you will use to host your websites.
- Install cPanel DNSOnly® on each of the servers that you will use as nameservers.
- Log in to the cPanel & WHM server and navigate to WHM’s DNS Cluster interface (WHM » Home » Clusters » DNS Cluster).
- If you have not already enabled DNS clustering on this server, perform the following steps to enable it:
- Click Enable DNS Clustering.
- Click Change.
- Click Return to Cluster Status to return to the DNS Cluster interface.
- Add each new nameserver to the cluster. To do this, perform the steps in our DNS Cluster documentation.
- Use WHM’s Synchronize DNS Records interface (WHM » Home » DNS Functions » Synchronize DNS Records) to manually synchronize each new nameserver with the DNS cluster.
- To confirm that each nameserver exists in the cluster, perform the following steps:
- Log in to the main cPanel & WHM server via SSH.
- Run the following command, where
example.comrepresents the nameserver name andiprepresents the nameserver’s IP address:dig +short example.com @ip
Use the primary nameserver as an intermediary
If necessary, place the primary nameserver between the cPanel & WHM server and the secondary nameserver. For each intermediate server that you add, data will transfer three times slower than for a direct link. For example, in the following configuration, the cPanel & WHM server labeled webserver.example.com sends DNS zone information to the nameserver labeled ns1.example.com, which then forwards the information to the nameserver labeled ns2.example.com.
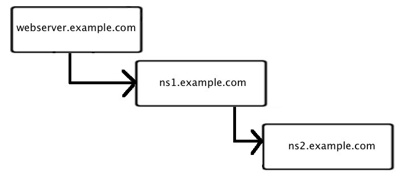
An intermediate nameserver between the web server and secondary nameserver is acceptable.
To create this configuration, you will need one cPanel & WHM server and at least two nameservers.
When you add a new nameserver to the cluster, you will need to log in to that nameserver and obtain an API token from that server.
To set up a DNS cluster with the primary nameserver as an intermediary, perform the following steps:
- Install cPanel & WHM on the server that you will use to host your websites.
- Install cPanel DNSOnly® on the servers that you will use as nameservers.
- Log in to the cPanel & WHM server and navigate to WHM’s DNS Cluster interface (WHM » Home » Clusters » DNS Cluster).
- If you have not already enabled DNS clustering on this server, perform the following steps to enable it:
- Click Enable DNS Clustering.
- Click Change.
- Click Return to Cluster Status to return to the DNS Cluster interface.
- Add the first nameserver to the cluster. To do this, perform the steps in our DNS Cluster documentation.
- Use WHM’s Synchronize DNS Records interface (WHM » Home » DNS Functions » Synchronize DNS Records) to manually synchronize the new nameserver with the DNS cluster.
- Log in to the nameserver that you just added, and then navigate to WHM’s DNS Cluster interface (WHM » Home » Clusters » DNS Cluster).
- If you have not already enabled DNS clustering on this server on the nameserver, perform the following steps to enable it:
- Click Enable DNS Clustering.
- Click Change.
- Click Return to Cluster Status to return to the DNS Cluster interface.
- Add the second nameserver to the cluster. To do this, perform the steps in our DNS Cluster documentation.
- Use WHM’s Synchronize DNS Records interface (WHM » Home » DNS Functions » Synchronize DNS Records) to manually synchronize the second nameserver with the DNS cluster.
- To confirm that each nameserver exists in the cluster, perform the following steps:
- Log in to the main cPanel & WHM server via SSH.
- Run the following command, where
example.comrepresents the nameserver name andiprepresents the nameserver’s IP address:dig +short example.com @ip
Use multiple intermediary nameservers
We do not recommend this method. It can significantly reduce performance.
This configuration uses multiple steps between the cPanel & WHM server and nameservers. In the example below, for cPanel & WHM server labeled web1.example.com to communicate with the nameserver labeled ns2.example.com, the information must pass through two intermediary servers: the intermediary cPanel & WHM server labeled web2.example.com and the intermediate nameserver labeled ns1.example.com. This increases the processor load on the servers because the nameserver software updates the DNS information on each step. This configuration slows the servers’ response time considerably.
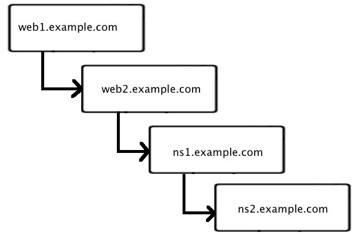
If you configure multiple steps between a web server and nameserver, the servers’ performance slows.
To create this configuration, you will need at least two cPanel & WHM servers and at least two nameservers.
When you add a server to the cluster, you will need to log in to that server to obtain your API token.
To set up a DNS cluster with multiple intermediary nameservers, perform the following steps:
- Install cPanel & WHM on the two servers that you will use to host your websites.
- Install cPanel DNSOnly® on the two servers that you will use as nameservers.
- Log in to the first cPanel & WHM server and navigate to WHM’s DNS Cluster interface (WHM » Home » Clusters » DNS Cluster).
- If you have not already enabled DNS clustering on this server, perform the following steps to enable it:
- Click Enable DNS Clustering.
- Click Change.
- Click Return to Cluster Status to return to the DNS Cluster interface.
- Add the second cPanel & WHM server to the cluster. To do this, perform the steps in our DNS Cluster documentation.
- Use WHM’s Synchronize DNS Records interface (WHM » Home » DNS Functions » Synchronize DNS Records) to manually synchronize the second cPanel & WHM server with the DNS cluster.
- Log in to the second cPanel & WHM server, and then navigate to WHM’s DNS Cluster interface (WHM » Home » Clusters » DNS Cluster).
- If you have not already enabled DNS clustering on this server, perform the following steps to enable it:
- Click Enable DNS Clustering.
- Click Change.
- Click Return to Cluster Status to return to the DNS Cluster interface.
- Add the first nameserver to the cluster. To do this, perform the steps in our DNS Cluster documentation.
- Use WHM’s Synchronize DNS Records interface (WHM » Home » DNS Functions » Synchronize DNS Records) to manually synchronize the first nameserver with the DNS cluster.
- Log in to the first nameserver, and then navigate to WHM’s DNS Cluster interface (WHM » Home » Clusters » DNS Cluster).
- If you have not already enabled DNS clustering on this server, perform the following steps to enable it:
- Click Enable DNS Clustering.
- Click Change.
- Click Return to Cluster Status to return to the DNS Cluster interface.
- Add the second nameserver to the cluster. To do this, perform the steps in our DNS Cluster documentation.
- Use WHM’s Synchronize DNS Records interface (WHM » Home » DNS Functions » Synchronize DNS Records) to manually synchronize the second nameserver with the DNS cluster.
- To confirm that each server exists in the cluster, perform the following steps:
- Log in to the main cPanel & WHM server via SSH.
- Run the following command, where
example.comrepresents the nameserver name andiprepresents the nameserver’s IP address:dig +short example.com @ip
Reverse Trust relationship
You must set up a Reverse Trust relationship between each server in a DNS cluster. This relationship allows servers in a DNS cluster to share records with one another. This relationship also requires that each server possesses an API token.
You can configure a Reverse Trust relationship for each server in WHM’s DNS Cluster interface (WHM » Home » Clusters » DNS Cluster). You can create an API token in WHM’s Manage API Tokens interface (WHM » Home » Development » Manage API Tokens) or via the WHM API 1 api_token_create function.
To check whether the servers in a DNS cluster can share records with one another, call the WHM API 1 cluster_member_has_trust_with function.
- When you create an API token for DNS clusters, use the DNS Clustering Access Control List (ACL) privilege. For more information, read the Edit Reseller Nameservers and Privileges documentation.
- You do not need to set up a Reverse Trust relationship for cPanel DNSOnly® servers or servers that use the Write-only DNS role.